
Do I have time to brush my teeth and do my makeup? – A quick and easy makeup routine.
First, a disclaimer. This blog post is LOOOOONG. And pretty detailed in terms of my makeup routine. Yes, to me, my routine is simple and fast, but my friends constantly tell me that it’s because I’m “good” at makeup and they are not. So they asked for a detailed explanation and I have granted them their wish. If you have no interest in reading all the details, scroll ALL the way to the bottom of this blog post for the quick video tutorial.
Ok, here we go…
99.9% of the time, I am THAT mom. The mom that drops her kid off at pre-k, wearing yoga pants, a sports bra, a volleyball shirt, and flip flops. More often than not, my hair is still in the same ponytail that I went to sleep in, and there’s a 75% chance I have not brushed my teeth yet. I have no idea how I got myself ready for work and got my children to school on time before I became a stay at home mom. These days, it seems like I can hardly manage to get all three of them in the car. Alive.
Everyone who knows me knows that I love makeup. Problem is, the days of spending hours in front of the mirror perfecting a smoky eye are over. If makeup gets applied to my face these days, it has to be done in less than ten minutes, and it has to be simple enough to be done whilst holding a 35 pound stage five clinger named Mack. I love watching tutorials by young, gorgeous, incredibly talented YouTube beauty gurus. However, there is a vast difference between their life and mine. It’s called reality. I also think there is a huge difference in makeup for women over 30 so I’m hoping this will appeal to those of us whose face looks like it’s actually held life experience.
The thing about getting older is that the more we age, the more specific we need to be about our makeup. Some people think that more is better, especially as we gain more wrinkles. I do not agree. Maybe more quality, but definitely not more in terms of quantity. To me, the more we slather on, the more chances there are to have heavy product sink into every nook and cranny, thereby making us look older. I’m not an expert, but this ain’t rocket science. At almost 35, I have actually dropped foundation all together to get a lighter, cleaner look.
Personally, when I smile giant, cheesy grins in pictures with my kiddos, I want my face to move and show emotion. Wrinkles are my proof that I’m doing my job as a mom. It doesn’t mean I don’t try to slightly slow down the aging process, but as I’ve gotten older, I have learned to adapt my makeup to my face, instead of trying to drastically alter my face just so that I can use the same beauty products I used when I was 19. Aging. It’s normal. And ok. Half the battle honestly, is skincare. Not taking care of your skin before you apply makeup is like slathering paint on a wall with 80’s wallpaper and not using primer. You have to remove the dull and dirty so you can start fresh and clean. I take really good care of my skin and my five minute morning and night routine can be found by clicking here.
Unless I have a MAJOR event (i.e. I’m in Vegas, I have an actual date with my husband, or I’m accepting an Oscar) this is my every day, quick makeup routine. For those special times, I will choose a long wearing foundation so I can squeeze more time out of my look. But for now, I’ve got this routine down to less than ten minutes and it lasts about 8-10 hours.

Step 1: Primer
This is not a make believe step. If you want your makeup to last, you have to set a good foundation. This hydration serum by Rodan + Fields is my favorite because of its high glycerin content which helps makeup adhere to the skin while also keeping it hydrated. Hydration = glowing skin. Glowing skin = youth. Boom. I allow my skincare regimen and the hydration serum to sit for a few minutes before applying my makeup. You can check out this primer here.
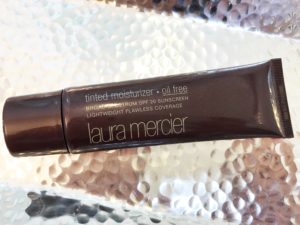
Step 2: Tinted moisturizer
I ditched foundations after having kids because 1. I don’t have time and 2. I don’t need it anymore. Tinted moisturizers give your skin a light coverage without feeling heavy, and they offer SPF to protect your skin from the sun. My favorite is Laura Mercier. I use my fingertips to apply it on my face and neck. I use the color “Fawn” in the summer and “Nude” in the winter. Shop for it here.
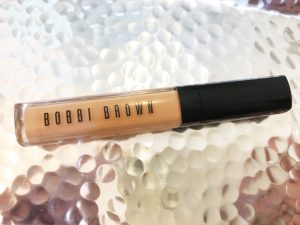
Step 3: Concealer
Normally, I only use this under my eyes, but since my darling youngest human left me with melasma, I need to apply it to my forehead, upper lip and cheeks until I can get rid of my hyperpigmentation. Because of this, I’m currently using a heavier instant full cover concealer by Bobby Brown in the shade “Natural Tan”. Shop for it here. In all the fancy YouTube videos, you’ll see twenty something girls create a giant “V” under their eye that extends all the way down to their nose. Listen ladies, if you’re over 30, those days are over. Unless you have no bags, putting that much concealer on is gonna make you look like you used a paintbrush to try and fill them in. Instead, place small dots in the arc under your eye and then blend everything in with a beauty blender. Just run it under water first and then squeeze it into a towel so that it’s damp.
**If you do not own a beauty blender, go buy one. NOW. It’s a magical sponge that evenly disperses any liquid or cream makeup, preventing it from cracking or getting stuck in fine lines. You don’t need a fancy one. I got mine here for under $10.
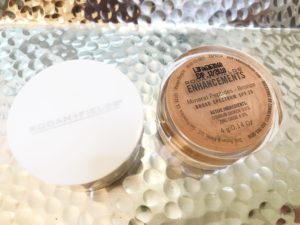
Step 4: Mineral Powder
I like to press and then buff a light mineral powder over my face to set the tinted moisturizer. This peptide powder from Rodan + Fields beats any other mineral powder I have ever tried. It literally blurs fine lines and wrinkles, has an SPF 30, and packs anti-aging properties into a golden powder. That’s winning on all ends here people. I use a flat top kabuki brush to apply. Check this powder/brush combo out here.
Step 5: Contour
This takes a little practice but makes a world of a difference. I have a round face, and if I eat a piece of bread, I have a really round face. So I combat this by creating a hollowed cheek that God didn’t give me naturally. Tip: you use darker colors for areas of your face that you want to shadow, suck in, or appear smaller (like cheeks or your forehead), and lighter colors for areas that you want to stand out. This tip however does not work to create a flat belly. Sorry. I use an angled brush by Kat Von D that can be found by clicking here. I suck in my cheeks and create a line that extends from the top of my ear, towards the corner of my mouth. My two favorite bronzing colors to use are the mineral peptide powder from Rodan + Fields in the shade “Bronze” (pictured above), and “Hoola” by Benefit. Shop for “Hoola” here.
**Tip: If you are older, use matte colors as opposed to bronzers with a shimmer.
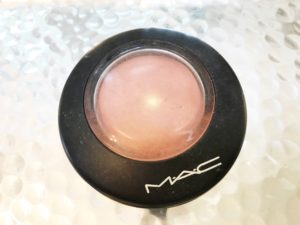
Step 6: Blush
Fake a smile and buff some blush on the apples of your cheeks, blending it back into your hairline. “Warm Soul” is a mineral blush by MAC and it’s my all time favorite. Shop for it here. I also use a MAC 129 brush to apply. I’ve had this one for years and it still works perfectly.
Step 7: Brows
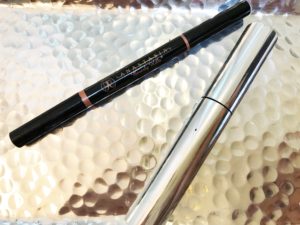
I have very light eyebrows so filling them in really makes a difference. I start from the inside of my brows and draw two lines, one on top, and one on bottom of my brow to outline them. Then, I fill the middle in with quick strokes so that the color looks like hair. Finally, I set my brows with a clear gel. I used to think that this step was dumb but it makes it so that every hair stays in place and so that you don’t lose an eyebrow throughout the day. No one does eyebrows like the brand Anastasia. I use their triangular brow definer in the shade “Blonde” and their brow gel as well. Click here for the pencil and here for the clear brow gel that I use. If I am late in the morning, I skip this step. I’m pretty sure my kid’s pre-k teacher would rather I brush my teeth than fill in my brows.
Step 8: Bronze
I use the same bronzer that I used to contour on a big fluffy brush, and buff it all over my face, especially where I drew my contour lines. This blends everything together so that there are no harsh lines. Think of blending like a bottle of champagne. There is no such thing as too much. Oh, and be sure to buff all the way down your neck and into your chest. No one looks good with a giant stripe along their jawline. Again, I skip this step if I am running late.
Step 9: Set under eyes
I use a light powder and a small brush to press powder under my eyes. This prevents my concealer from cracking, smudging, or settling into lines during the day. I either use the R+F peptide powder mentioned above in the shade Light, or I use a concealer/setting powder by Bobby Brown. You can find it here.
Step 10: Highlight
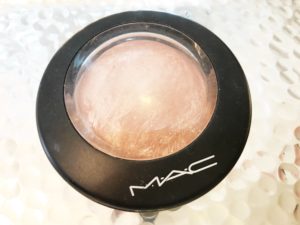
THIS IS MY FAVORITE STEP! Remember what I said earlier about using a light color to make parts of your face stand out? Yeah, that’s this part right here. Highlighters make you look like you just came home from a tropical vacation and your skin is literally glowing. For older women, try to find one with little to no glitter. We want to shimmer. Not look like a stripper under a 70’s disco ball. I have about 12 highlighters and I have a strong love affair with each of them. In the video I am wearing the one pictured above by MAC called “Soft and Gentle”. Click here to shop for it. Becca Cosmetics also makes beautiful highlighters and “Champagne Pop” is probably one of my favorites. You can find it here. I use a light, feathery foundation brush to apply it to the bridge of my nose, my cupid’s bow (the v above your top lip), my chin, and the tops of my cheeks. I also put it on my collarbone sometimes. So that it looks like I actually have collarbones.
Step 11: Mascara
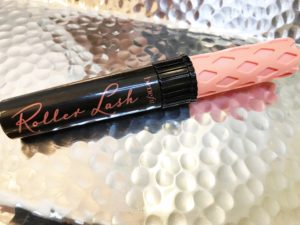
I mean. Does this need an explanation? I use an eyelash serum for growth and thickness so I definitely apply lots of mascara to show them off. Mascara really is about personal preference. I’m currently using Roller Lash by Benefit which you can find here, but I have several favorites.

Step 12: Lips
I rarely wear lipstick. I think wearing it with yoga pants just makes it look like you’re trying too hard. And well, I try as little as humanly needed because I have a million other things more important to accomplish. This lip mask by Bite is my favorite and I have a tube in every nook and cranny of my house. It’s really thick and lasts for hours, even for mouth breathers like me. Click here to shop.
Step 13: Setting spray
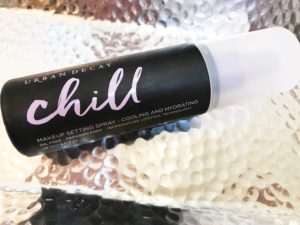
This step will change your life. If you’re going to spend more than one minute on your makeup, it better last. I’ll spare you all the reasons why it is necessary. It is. I have yet to find one that beats Urban Decay’s Chill. It should be the last thing you spray on your face and can be found here.
So that’s it! Yes, I know you’re thinking there is no way 13 steps can be done in under 10 minutes. Trust me, it can. Many of the steps are well under a minute. Just practice and use the tutorial video below to help. I have no desire to become a YouTube beauty guru but lots of people asked for a visual so here it is. I literally filmed AND edited this all on my iPhone using iMovie. No filters, and no fancy effects except time lapse to get it under two minutes. I am using a halo ring light so that I can actually see what I am doing. Old age sucks people. Also, I have collected this makeup over time and it lasts for months so don’t feel like you need to go out and get brand new everything. I just know that having specifics and a visual help me.
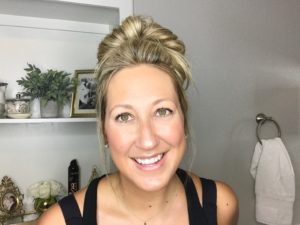
Before

After
Brushes

So enjoy! Drop a comment below if there is something more specific you’d like me to write about next!
Join the newsletter
Subscribe to get our latest content by email.